The toilet flapper is a small rubber disc that controls the flow of water from the tank into the bowl. When it wears out, water trickles past it constantly, and the toilet runs without stopping.
Replacing it is one of the simplest plumbing repairs a homeowner can do. It requires no special tools, costs under ten dollars, and takes about 15 minutes from start to finish.
This guide walks through the full process, including how to pick the right replacement, how to remove the old one, and how to set the chain length correctly so the new flapper works properly from the first flush.
Confirming the Flapper Is the Problem
Before buying a new flapper, confirm that it is what is causing the running toilet. The fastest way is the dye test.
- Add several drops of food coloring or a dye tablet to the toilet tank water.
- Do not flush. Wait 10 to 15 minutes.
- Check the toilet bowl. If colored water appears without flushing, the flapper is leaking and needs to be replaced.
You can also check by pressing down gently on the flapper with your finger while the toilet is running. If the running stops when you press down, the flapper is confirmed as the culprit.
| RELATED: How to Fix a Running Toilet |
|---|
| A leaking flapper is the most common cause of a running toilet, but not the only one. If replacing the flapper does not stop the running, read our full guide on diagnosing and fixing all three common causes. |
Choosing the Right Replacement Flapper
Flappers are not one-size-fits-all. Using the wrong size or type will result in a flapper that does not seal properly or does not fit the overflow tube at all.
Check the toilet model number first
The most reliable way to find the correct flapper is to look up your toilet model number. It is usually printed on a sticker inside the tank lid or stamped into the porcelain at the back of the tank, near the waterline.
Search the model number on the manufacturer’s website or at a hardware store. Most manufacturers list the exact replacement part number for your model.
Match the old flapper if you cannot find the model number
If you cannot find the model number, remove the old flapper and take it to the hardware store for identification. Match it by size, the shape of the side ears, and the material.
| Flapper Size | Flush Valve Opening | Common In |
| 2 inch | Standard opening | Most toilets made before 2005 |
| 3 inch | Large opening | Many toilets made after 2005 are high-efficiency models |
| Tower or canister style | Varies | Some Kohler and American Standard models |
| Universal flappers work in most cases |
|---|
| If you cannot find an exact match, a universal flapper with adjustable ears fits most standard toilets. These are widely available and cost the same as a standard flapper. Check the packaging to confirm compatibility with your flush valve size. |
Flapper material matters too
Standard rubber flappers are the most common and work well in most households. If your water is heavily chlorinated or you use bleach cistern tablets, choose a chlorine-resistant flapper made from silicone or a chloramine-resistant rubber compound. These last significantly longer in treated water.
What You Need
- Replacement flapper matched to your toilet model
- Rubber gloves
- A small bucket or towels for any drips
- Nothing else is required
Step-by-Step: Replacing the Toilet Flapper
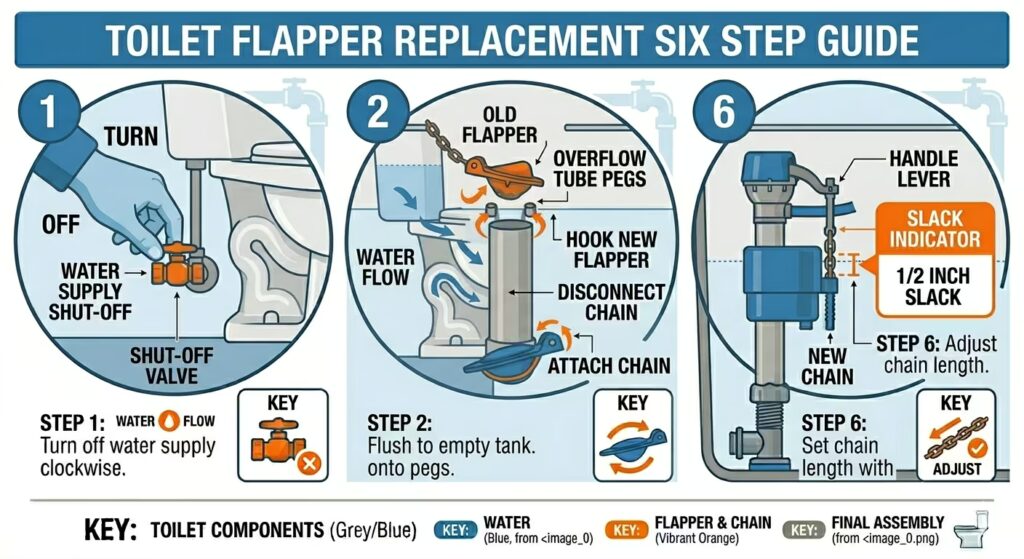
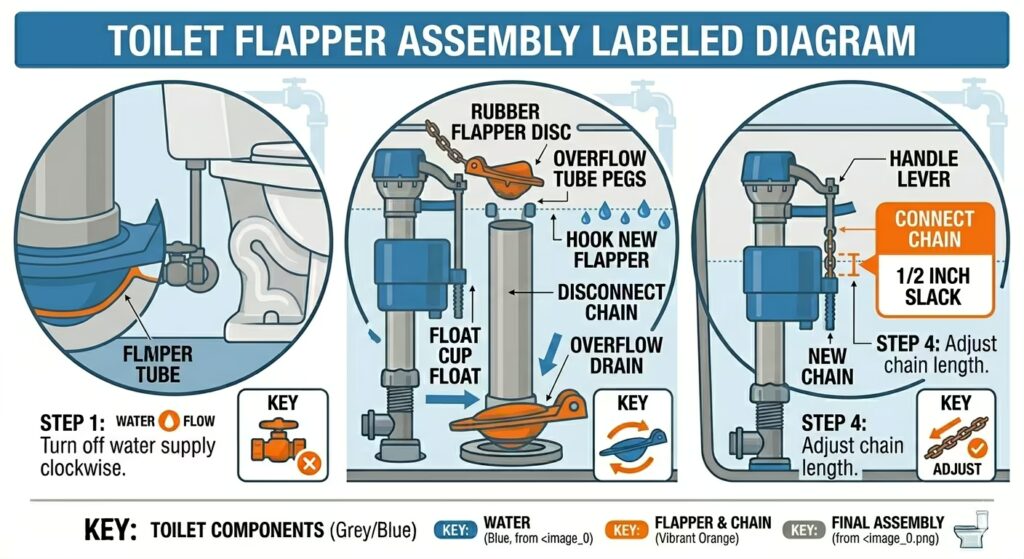
Step 1: Turn off the water supply
Find the shut-off valve behind or beneath the toilet on the wall. Turn it clockwise until it stops. The water supply to the tank is now off.
If the valve is stiff and hard to turn, do not force it. Shut off the main water supply to the house instead, and note that the shut-off valve may need to be replaced.
Step 2: Empty the tank
Flush the toilet and hold the handle down to drain as much water from the tank as possible. The tank will not refill because the water supply is off.
A small amount of water will remain at the bottom of the tank. This is normal and does not need to be removed for a simple flapper swap.
Step 3: Unhook the old flapper
Look at the flapper. It has two side arms called ears that loop around pegs on either side of the overflow tube. Slide both ears off their pegs. The flapper will lift free from the flush valve seat.
Some older flappers are attached directly to the overflow tube with a ring collar rather than with ears. If yours has a ring collar, slide it up and off the overflow tube.
Step 4: Detach the chain
The chain connects the top of the flapper to the flush handle lever inside the tank. Unclip or unhook the chain from the lever. The old flapper assembly is now fully removed.
Dispose of the old flapper in the bin. Do not rinse it down the drain.
Step 5: Attach the new flapper
Slide the ears of the new flapper onto the pegs on either side of the overflow tube. Press firmly until each ear clicks or seats fully onto its peg. The flapper disc should sit flat and centered over the flush valve opening below it.
If your new flapper uses a ring collar instead of ears, slide the collar down over the overflow tube until it rests on the base.
Step 6: Connect the chain and set the length
Clip the chain onto the flush handle lever. This is the most important step to get right. Chain length determines whether the flapper seals properly.
The chain should have approximately half an inch of slack when the flapper is seated. Too tight and the flapper will be held slightly open, allowing water to leak constantly. Too loose, and the flapper may not lift fully when you flush, resulting in a weak or incomplete flush.
Adjust by clipping the chain to a different link on the lever. Most levers have a row of holes or a clip that can be moved to change the effective chain length.
Step 7: Turn the water back on and test
Turn the shut-off valve counterclockwise to restore the water supply. Let the tank fill completely. Watch and listen as it fills.
The fill valve should shut off cleanly when the water reaches the correct level. There should be no sound of running water once the tank is full.
Flush the toilet. The flush should be strong and complete. The flapper should drop back onto the seat, and the tank should refill without any water trickling into the bowl afterward.
If the Toilet Still Runs After Replacement
A new flapper that still leaks is almost always a chain or seating problem rather than a defective part.
The chain is too short
If the toilet runs immediately after replacement, check the chain first. Press the flapper down with your finger. If the running stops when you press it, the chain is holding the flapper slightly open. Move the chain clip to a lower link on the lever to add more slack.
Flapper is not seated correctly
Remove the flapper and reseat it. The disc should sit perfectly flat and centered over the flush valve opening. If it is twisted or off-center, the rubber edge will not create a complete seal.
The flush valve seat is damaged
Run your finger around the rim of the flush valve seat where the flapper sits. If it feels rough, gritty, or has visible chips or cracks, the flapper cannot seal against it, regardless of its age.
A flush valve seat repair kit includes a self-adhesive seat ring that fits over the damaged surface. This is a cheap fix that avoids replacing the entire flush valve. If the damage is severe, a full flush valve replacement or toilet replacement may be the more practical option.
Wrong flapper size
A flapper that is too small will not fully cover the flush valve opening. A flapper that is too large will overhang and prevent a clean seal at the edges. If the new flapper appears not to fit correctly, return it and get the right size using the toilet model number.
How Often Should You Replace a Toilet Flapper?
A standard rubber flapper lasts approximately 4 to 5 years under normal household conditions. Certain factors shorten this significantly.
| Condition | Expected Flapper Lifespan |
| Normal household water | 4 to 5 years |
| Heavily chlorinated municipal water | 2 to 3 years |
| Bleach cistern tablets in regular use | 2 to 3 years |
| Silicone or chlorine-resistant flapper | 6 to 8 years |
| Hard water with high mineral content | 3 to 4 years |
The dye test, once a year, tells you whether your flapper is leaking before the running becomes audible. A slow flapper leak wastes just as much water as an obvious one.
Frequently Asked Questions
Do I need to turn off the main water supply or just the toilet valve?
The toilet shut-off valve behind or beneath the toilet is all you need to turn off for a flapper replacement. You do not need to shut off the main supply to the house.
If the toilet shut-off valve is seized or does not work properly, then yes, use the main supply valve and add replacing the toilet shut-off valve to your repair list.
My toilet has no chain. How does the flapper connect to the handle?
Some toilets use a direct-lift mechanism instead of a chain. In these designs, a plastic arm connects directly from the handle to the top of the flapper. The flapper replacement process is the same, but instead of adjusting chain length, you adjust the position of the arm connector.
If you are unsure how your mechanism works, photograph the inside of the tank before removing anything so you have a reference for reassembly.
Can I reuse the chain from the old flapper?
Yes. The chain is not part of the flapper and does not wear out the way the rubber does. If the chain is in good condition with no rust or broken links, reuse it by simply unclipping it from the old flapper and attaching it to the new one.
The flapper ears do not seem to fit the pegs. What am I doing wrong?
The ears should loop around the pegs on the overflow tube rather than sliding over them from the top. Orient the flapper so the ears point outward and hook over the pegs below. If the ears are genuinely the wrong size, the flapper is not the right type for your toilet.
How do I know what size flapper to buy without removing the old one?
Measure the flush valve opening at the bottom of the tank. Put a ruler across the opening. A two-inch opening needs a two-inch flapper. A three-inch opening needs a three-inch flapper.
Alternatively, use the toilet model number on the inside of the tank lid to look up the exact replacement part. This is the most reliable method and takes less than a minute.
A Job Anyone Can Do in a Lunch Break
Replacing a toilet flapper is the kind of repair that gives homeowners confidence. It is straightforward, it costs almost nothing, and the result is immediate.
The dye test tells you when it is time. The model number tells you what to buy. The steps above get it done in under 15 minutes.
Once you have done it, you will never hesitate to tackle it again.