Replacing a showerhead is one of the easiest plumbing jobs in the home. It requires one tool, no pipe cutting, no soldering, and no prior experience. Most people finish the job in under 20 minutes.
The reasons to replace a showerhead are practical. A clogged head with weak or uneven spray, an outdated head wasting water, or simply wanting an upgrade are all good reasons to swap it out yourself rather than paying a plumber.
This guide covers everything from choosing the right replacement to getting a leak-free seal on the first try.
When Replacement Makes More Sense Than Cleaning
Not every showerhead problem requires replacement. Knowing when to clean and when to replace saves time and money.
| Situation | Best Action |
| Weak spray from mineral buildup | Clean first with a vinegar soak |
| Uneven spray after cleaning | Replace if cleaning did not resolve it |
| Visible corrosion on the head or arm connection | Replace |
| Dripping from the head when the shower is off | Usually a valve issue, not the head itself |
| Leaking at the wall arm connection | Replace the head and reapply the thread tape |
| Wanting better pressure or spray options | Replace with an upgrade |
| Water-saving upgrade for a rental | Replace with a low-flow head |
| RELATED: How to Remove Hard Water Stains from Bathroom Fixtures |
|---|
| If the showerhead nozzles are clogged but the head itself is in good condition, an overnight vinegar soak often restores full spray without replacement. Read our guide on the method and what to expect. |
Choosing the Right Replacement Showerhead
Nearly all residential shower arms use a standard half-inch NPT thread connection. This means almost any showerhead sold in a US hardware store will fit your existing shower arm without any adapters.
The choice comes down to spray type, water efficiency, and finish.
Spray type
- Fixed showerhead: mounts directly to the wall arm. Simple, reliable, and the most common type. Good for straightforward replacements.
- Handheld showerhead: attaches to the arm via a hose with a holder bracket. Useful for bathing children, washing pets, and rinsing the shower walls.
- Rain showerhead: a large-diameter head that produces a wide, gentle rainfall spray. Usually requires a longer arm extension to position it overhead correctly.
- Dual or combination head: combines a fixed head and a handheld on a single arm connection using a diverter. More involved to install, but adds flexibility.
Water efficiency
Standard showerheads flow at 2.5 gallons per minute (GPM). WaterSense-certified low-flow heads flow at 2.0 GPM or less and are designed to maintain good pressure despite the lower flow rate.
For a household of four, switching from a 2.5 GPM to a 2.0 GPM showerhead saves roughly 700 gallons per month. Low-flow heads are also a good choice for homes with lower water pressure, as they are designed to perform well at reduced flow.
Finish
Choose a finish that matches your existing fixtures for a consistent look. Chrome is the most durable and easiest to maintain. Brushed nickel is popular and hides water spots well. Matte black is a modern choice but requires gentle cleaning to avoid dulling the finish over time.
What You Need
- Replacement showerhead
- Adjustable wrench or slip-joint pliers
- Plumber’s thread tape (also called PTFE tape or Teflon tape)
- An old cloth or rag to protect the finish
- A small bucket or towels to catch any drips
| Thread tape is essential |
|---|
| Thread tape creates the watertight seal between the showerhead and the shower arm threads. Do not skip it. A showerhead installed without thread tape will almost always drip at the connection, and the tape costs under two dollars at any hardware store. |
Step-by-Step: Replacing the Showerhead
Step 1: Turn off the shower and prepare the area
You do not need to turn off the main water supply or the bathroom shut-off to replace a showerhead. Simply make sure the shower is turned off at the handle.
Place an old towel or bucket in the shower tray to catch the small amount of water that will drip when you remove the old head.
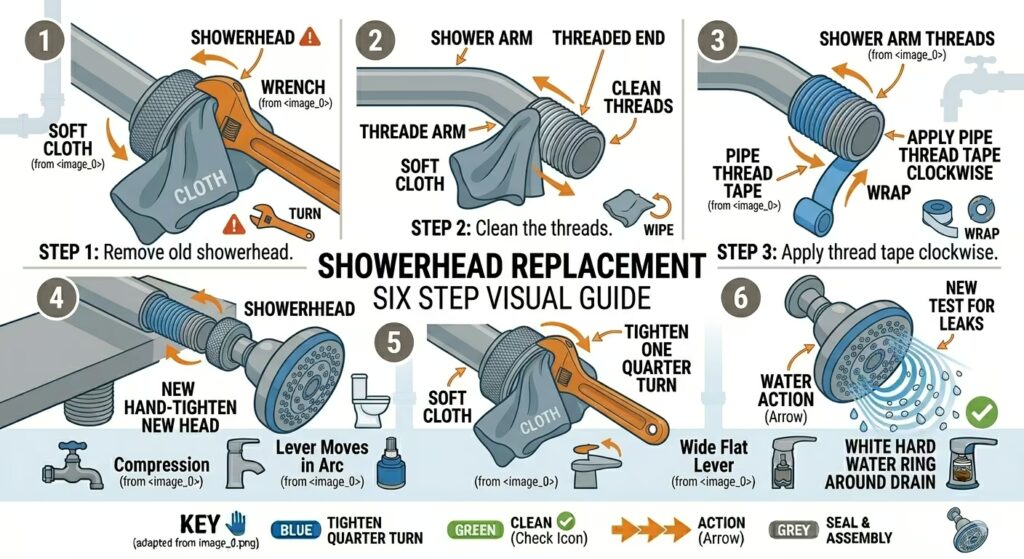
Step 2: Remove the old showerhead
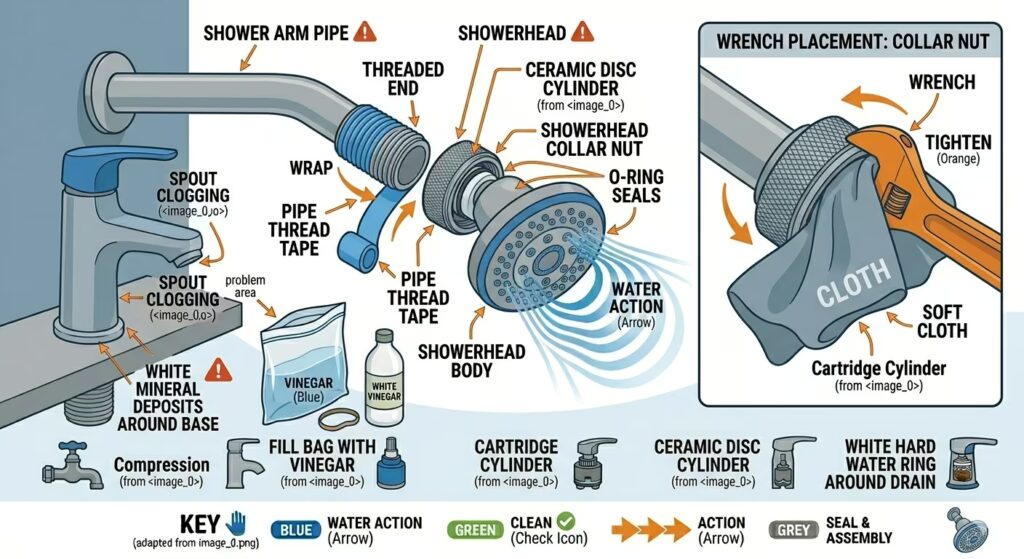
Wrap a cloth around the collar nut where the showerhead connects to the shower arm. This protects the finish from wrench marks.
Grip the collar nut with an adjustable wrench through the cloth, then turn it counterclockwise to loosen. Once loose, unscrew the rest by hand.
Hold the shower arm steady with your other hand as you unscrew the head. Do not let the arm twist inside the wall. If the arm turns with the head, grip the arm itself with a second wrench to hold it still.
| Do not let the shower arm spin on the wall |
|---|
| The shower arm connects to a pipe fitting inside the wall. If the arm rotates while you are removing the showerhead, it can loosen that fitting and cause a leak inside the wall. Always hold the arm steady when applying force to the showerhead connection. |
Step 3: Clean the shower arm threads
Once the old head is off, inspect the shower arm threads. Remove any old thread tape by unwinding it and pulling it off. Wipe the threads clean with a dry cloth to remove any residue, mineral deposits, or debris.
The threads should be clean and visible before applying new tape. Old tape left on the threads bunches the new tape and can prevent a good seal.
Step 4: Apply thread tape
This step is critical and takes about 20 seconds. Thread tape prevents water from leaking at the connection and makes the showerhead easier to remove next time.
- Hold the shower arm with the threaded end pointing toward you.
- Press the end of the tape against the threads and begin wrapping clockwise, in the same direction as the showerhead will screw on.
- Wrap the tape around the threads three times, stretching it slightly as you go so it seats into the thread grooves.
- Tear the tape and press the end against the threads to secure it.
| Clockwise wrapping is important |
|---|
| Thread tape must be wrapped clockwise when viewed from the end of the arm. If the tape is wrapped counterclockwise, the tape will unravel when you screw the showerhead on. The head threads counterclockwise, so the tape must run in the same direction to stay in place. |
Step 5: Attach the new showerhead
Screw the new showerhead onto the arm threads by hand, turning clockwise. Thread it as far as you can by hand until it is snug.
Position the showerhead to face the correct direction before tightening further. Once wrench-tightened, repositioning it risks leaking.
Step 6: Tighten with a wrench
Wrap the cloth around the new showerhead collar nut and use the adjustable wrench to tighten it by about a quarter turn past hand-tight.
Do not overtighten. Over-tightening cracks the collar nut on plastic showerheads and can strip the threads on the shower arm. Snug and firm is the goal, not as tight as possible.
Step 7: Test for leaks
Turn the shower on and let it run for a full minute. Check the connection point between the showerhead and the shower arm carefully while the water is running.
A small number of drops during the first few seconds as the connection seat is normal. Continuous dripping or a visible stream of water from the connection means the seal is not right.
What to Do If the Connection Leaks
A leak at the shower arm connection after installation is almost always due to a thread-tape issue. Work through these steps in order.
Step 1: Check whether it is dripping or streaming
A drip that stops within 30 seconds of turning the shower on can be normal as air clears the line. A continuous drip or stream means the seal is not working.
Step 2: Add more thread tape
Turn the shower off. Remove the showerhead by unscrewing it. Remove the existing tape completely. Apply five wraps of new tape rather than three, stretching it firmly into the grooves. Reinstall and test again.
Step 3: Check the showerhead washer
Most showerheads come with a rubber washer already fitted inside the connection collar. If it has been dislodged or is missing, no amount of thread tape will create a full seal.
Remove the showerhead, look inside the collar for the washer, and make sure it is seated flat against the back of the collar before reinstalling.
Step 4: Inspect the shower arm threads
If the arm threads are visibly damaged, stripped, or corroded, they may not form a proper seal regardless of tape application. Damaged arm threads require replacing the shower arm itself, which involves accessing the pipe connection in the wall and is best done by a plumber.
Installation Notes for Specific Showerhead Types
Handheld showerhead
A handheld unit connects to the arm with a bracket holder and a flexible hose. The bracket screws or clips onto the arm connection, and the hose connects to the bracket.
Apply thread tape to the arm threads before screwing on the bracket. Then attach the hose to the bracket connection, with a second application of thread tape at that joint. Test both connections for leaks.
Rain showerhead
Large rain heads are heavier than standard showerheads. Make sure the shower arm is firmly secured in the wall before installing a heavy rain head. If the arm wobbles or feels loose, have it secured before adding more weight.
Many rain showerheads come with an S-shaped or extended arm that repositions the head overhead. These arms have two threaded connections rather than one. Apply thread tape to both connections.
Dual showerhead with diverter
A dual-head system uses a diverter fitting that connects to the arm and has two outlets, one for each head. This requires three threaded connections, with tape applied at each.
Test all three connections independently before considering the installation complete.
Frequently Asked Questions
Do I need to turn off the main water supply to replace a showerhead?
No. The shower arm has no shut-off valve of its own, but as long as the shower handle is in the off position, water will not flow while you work. A small amount of water remaining in the arm will drip when you remove the old head, which is normal.
The old showerhead will not budge. What should I do?
Mineral buildup around the threads often bonds a showerhead firmly to the arm over the years. Wrap the connection in a cloth soaked in white vinegar and leave it for an hour to dissolve the deposits. Then try again with the wrench while firmly holding the arm steady.
If it still will not move, apply penetrating oil to the connection and wait 30 minutes. Use firm, steady pressure rather than jerking the wrench. If the arm begins to twist in the wall, stop and call a plumber to avoid a wall leak.
Can I install a showerhead with higher water pressure than my current one?
The pressure at your showerhead is determined by your home’s water supply pressure, not the showerhead itself. A showerhead cannot increase water pressure beyond what the supply delivers.
A showerhead can concentrate or restrict the flow to create a more forceful spray sensation. Look for heads rated for low-pressure environments if your home has naturally low pressure, as these are designed to produce a satisfying spray even with reduced flow.
My new showerhead leaks from the nozzles when the shower is off. Is that normal?
A few drops from the nozzles after turning the shower off is normal as the remaining water in the head drains out. This typically stops within a minute.
If water drips continuously from the nozzles when the shower is fully off, the problem is not the showerhead. It is the shower valve, which is not shutting off completely. This is a separate repair involving the valve cartridge inside the wall.
How often should a showerhead be replaced?
There is no fixed lifespan for a showerhead. A quality metal head with good water quality can last 10 to 20 years. A budget plastic head in hard water may need replacement in 3 to 5 years as mineral buildup permanently clogs the nozzles.
Replace when spray performance cannot be restored by cleaning, when corrosion is visible, or when you simply want an upgrade. There is no plumbing reason to wait for a failure to occur.
One of the Easiest Upgrades in the Home
Replacing a showerhead is genuinely one of the most accessible home improvement jobs available. One wrench, one roll of thread tape, and 20 minutes give you a fully upgraded shower with a warranty and no installation fee.
Apply the tape clockwise; do not overtighten; hold the arm steady while you work; and test for leaks before you call it done. That is the full checklist.
Once you have done it, it takes about 10 minutes the next time.