A running toilet is one of the most wasteful plumbing problems in the home. A toilet that runs continuously can waste between 200 and 400 gallons of water per day — that is, thousands of gallons a month — showing up on your water bill for something that costs less than ten dollars to fix.
The good news is that almost every running toilet is caused by one of three things, all of which are straightforward to diagnose and repair without any plumbing experience.
This guide identifies which of the three causes is responsible for your running toilet and walks you through fixing each one step by step.
Step One: Diagnose Which Part Is Causing the Problem
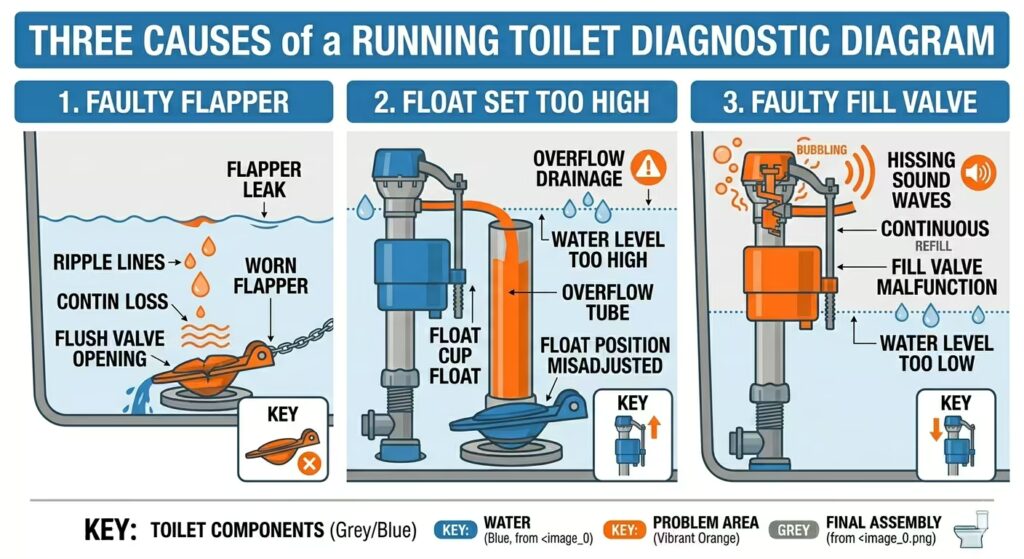
Before touching anything, lift the lid off the toilet tank and set it safely aside. Watch and listen for 30 seconds. The diagnosis is visual and takes less than a minute.
| What You See or Hear | Likely Cause | Fix Needed |
| Water trickles into the bowl constantly | Faulty flapper | Replace the flapper |
| Water level above the overflow tube | Float set too high | Adjust or replace the float |
| Hissing sound, fill valve running non-stop | Faulty fill valve | Adjust or replace the fill valve |
| Water rises until it pours into the overflow tube | The float is set too high, or the fill valve is stuck open | Adjust the float first, then fill the valve |
The dye test for a faulty flapper
If you can hear water running but cannot see it clearly, the dye test confirms whether the flapper is leaking. Add a few drops of food coloring or a dye tablet into the tank water. Do not flush. Wait 10 to 15 minutes.
If coloured water appears in the toilet bowl without flushing, the flapper is leaking. Water is seeping past the flapper seal and flowing directly into the bowl. Replace the flapper.
What You Need
- Adjustable pliers or a wrench
- Replacement flapper (for flapper fix) — costs $5 to $15 at any hardware store
- Replacement fill valve (for fill valve fix) — costs $10 to $20
- A sponge and bucket to empty the tank if needed
- Rubber gloves
| Bring the old part to the store if you can |
|---|
| Toilet parts are not fully standardized across manufacturers. Removing the old flapper or fill valve and taking it with you ensures you buy the correct replacement. Alternatively, photograph the tank interior and the model number on the inside of the tank lid before going to the store. |
Fix 1: Replacing a Faulty Flapper
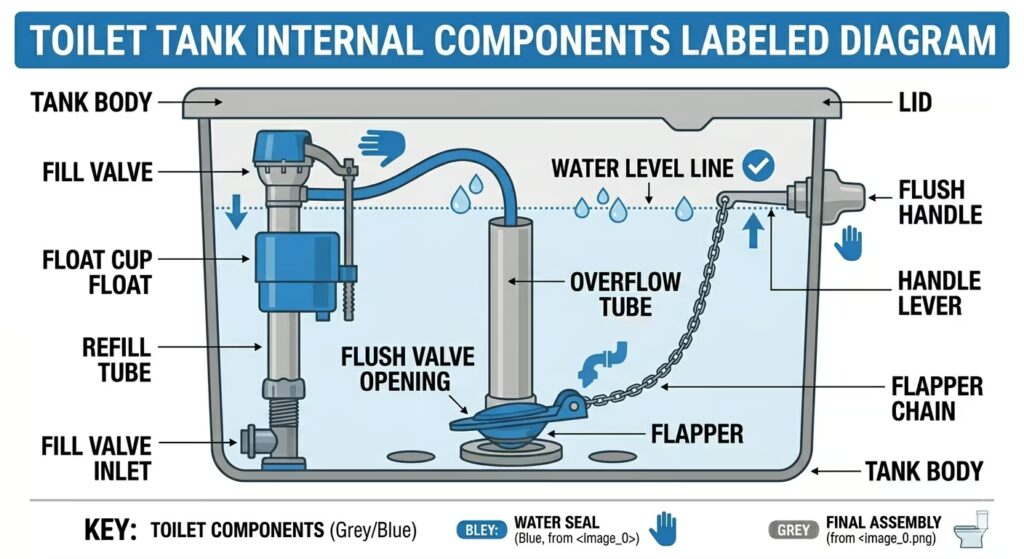
The flapper is the rubber seal at the bottom of the tank that covers the flush valve opening. When you flush, the chain lifts the flapper, water rushes into the bowl, and the flapper drops back to reseal the tank.
Over time, the rubber warps, hardens, or develops mineral deposits that prevent a clean seal. This is the most common cause of a running toilet and the easiest to fix.
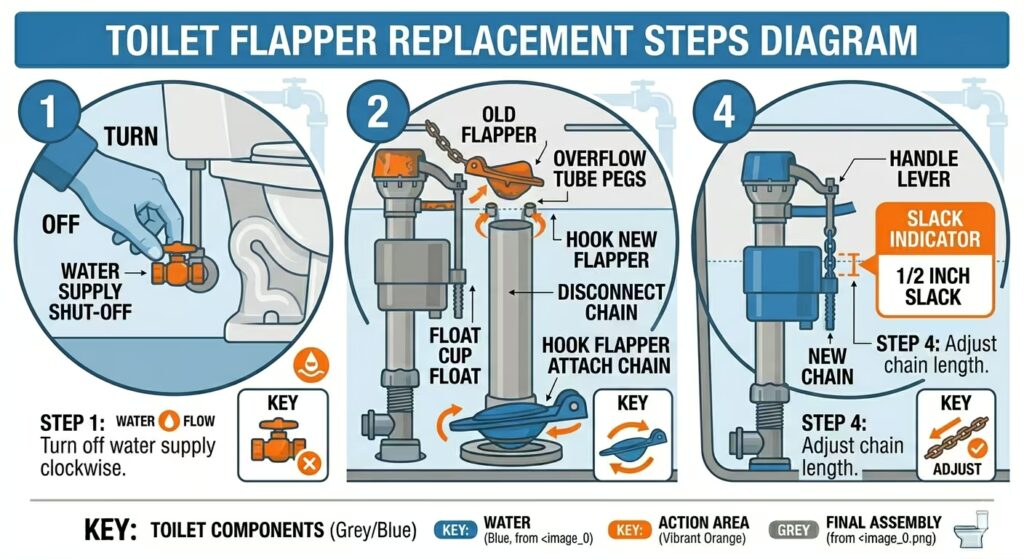
- Turn off the water supply to the toilet. The shut-off valve is behind or beneath the toilet on the wall. Turn it clockwise until it stops.
- Flush the toilet to empty the tank. Hold the handle down to drain as much water as possible.
- Remove the old flapper. Most flappers have two side arms that hook onto pegs on either side of the overflow tube. Unhook these arms and disconnect the chain from the flush handle lever.
- Take the old flapper to the hardware store, or use the toilet model number to buy the correct replacement.
- Attach the new flapper by hooking its side arms onto the overflow tube pegs. Connect the chain to the flush handle lever. Leave about half an inch of slack in the chain — too tight and the flapper will not seal; too loose, and it may not lift fully when flushed.
- Turn the water supply back on and let the tank fill. Flush once to test. Watch the tank refill and confirm the water stops at the correct level without trickling into the bowl.
| RELATED: How to Replace a Toilet Flapper in Under 15 Minutes |
|---|
| For a more detailed walkthrough of flapper replacement, including how to identify the right flapper type for your toilet, read our dedicated guide in the Toilets and Fixtures category. |
Fix 2: Adjusting the Float
The float controls the water level in the tank. When the tank fills after a flush, the float rises with the water level and signals the fill valve to shut off when it reaches the correct height.
If the float is set too high, the water level rises above the top of the overflow tube, causing the bowl to drain continuously. The fill valve keeps running to replenish the water draining away — this is the sound of a running toilet that never stops.
How to identify your float type
There are two main float designs, and the adjustment method differs slightly between them.
- Ball float: a large round ball on the end of a metal or plastic arm attached to the fill valve. Older design, still common in homes built before the 1990s.
- Cup float: a cylindrical float that slides up and down directly on the fill valve body. The modern standard in most toilets was made after the 1990s.
Adjusting a ball float
The water level should sit about one inch below the top of the overflow tube. If it is higher than this, the ball float needs to be lowered.
- Bend the metal arm connected to the ball float downward slightly. This lowers the point at which the float signals the fill valve to shut off.
- Alternatively, if the arm has an adjustment screw at the fill valve end, turn it counterclockwise to lower the water level.
- Flush the toilet and let the tank refill. Check the new water level. Repeat the adjustment if needed until the water sits one inch below the overflow tube.
Adjusting a cup float
Cup floats have a clearly visible adjustment mechanism — either a clip, a screw, or a twist-and-lock collar on the fill valve body.
- Find the adjustment clip or screw on the side of the fill valve. It may be labeled with up and down arrows.
- Pinch the clip and slide it downward, or turn the adjustment screw counterclockwise, to lower the float setting.
- Flush and let the tank refill to check the new water level. The water should stop 1 inch below the top of the overflow tube.
Fix 3: Replacing a Faulty Fill Valve
If adjusting the float does not stop the running, or if the fill valve hisses and runs continuously regardless of the water level, the fill valve itself needs to be replaced.
Replacing a fill valve is slightly more involved than a flapper swap, but it is still a confident DIY job. The entire process takes about 30 minutes.
- Turn off the water supply valve behind the toilet clockwise until it stops.
- Flush to empty the tank. Use a sponge to remove the remaining inch or so of water that does not drain with the flush.
- Disconnect the water supply line from the bottom of the tank. This is the flexible tube that runs from the shut-off valve to the tank. Have a small bucket ready, as some water will drip.
- Unscrew the locknut holding the fill valve to the tank from underneath. This is usually plastic and can be turned by hand, or use pliers if it’s tight.
- Lift the old fill valve straight out of the tank.
- Insert the new fill valve into the tank opening. Most replacement fill valves are adjustable to fit different tank heights — set the height so the critical level mark on the fill valve sits one inch above the top of the overflow tube.
- Hand-tighten the locknut from underneath. Do not overtighten — snug is enough.
- Reconnect the water supply line and turn the water back on slowly.
- Let the tank fill. The fill valve should shut off cleanly when the water reaches the set level. Adjust the float clip on the new valve to raise or lower the level.
- Flush several times to confirm the toilet fills correctly and stops running completely.
How Much a Running Toilet Actually Costs You
A slow toilet leak — water trickling steadily past a worn flapper — wastes around 200 gallons per day. A fast leak with water visibly running can waste 400 gallons or more.
| Leak Type | Daily Waste | Monthly Cost (est.) |
| Slow flapper leak | 200 gallons | $15 to $30 extra |
| Moderate running toilet | 300 gallons | $25 to $50 extra |
| Fast constant run | 400+ gallons | $40 to $80+ extra |
| Cost of a new flapper | One-time fix | $5 to $15 total |
A $10 flapper pays for itself in the first day it fixes a running toilet. There is no home repair with a better return on investment.
When to Call a Plumber
The three fixes above resolve the vast majority of running toilet problems. There are a few situations where a plumber is the right call.
- The toilet runs after replacing the flapper and adjusting the float — the flush valve seat itself may be worn or cracked, and needs professional assessment
- Water is leaking from the base of the toilet rather than from inside the tank — this indicates a wax ring failure, which requires removing and reseating the toilet
- The toilet is very old, and multiple components are worn — a full toilet replacement may be more cost-effective than successive part replacements
- You are uncomfortable working with the plumbing connections under the tank — a plumber can complete a fill valve replacement in under an hour
Frequently Asked Questions
How do I know if my toilet is running if I cannot hear it?
Use the dye test. Add a few drops of food coloring to the tank water. Do not flush. If coloured water appears in the bowl within 15 minutes, the toilet is running even if the sound is too faint to hear.
Silent leaks through a worn flapper are common and waste just as much water as audible ones. Test any toilet you suspect has a leak once a year.
I replaced the flapper, but the toilet is still running. What next?
Check the chain length first. A chain that is too short holds the flapper slightly open, preventing a clean seal. Add a link or reconnect it lower on the handle lever to increase slack.
If the chain is fine, inspect the flush valve seat — the circular opening the flapper sits on. Run your finger around the rim. If it feels rough, gritty, or has visible chips, the flapper cannot seal properly against it. A flush valve seat repair kit or full flush valve replacement is the next step.
Can a running toilet cause water damage?
A toilet running internally — water leaking from the tank into the bowl — does not cause visible water damage. It wastes water and raises your bill, but stays contained within the toilet.
A toilet leaking externally — from the base, tank bolts, or supply line connections — can cause water damage to the floor and subfloor. Check around the base and connections if you notice any dampness outside the toilet.
My toilet randomly runs for a few seconds and then stops. What causes that?
This is called phantom flushing or ghost flushing. It happens when the flapper has a very slow leak. Water gradually seeps from the tank into the bowl, and when the tank level drops low enough, the fill valve kicks on briefly to top it up.
The fix is the same — replace the flapper. Even a slow, intermittent leak wastes significant water over time and will worsen as the flapper continues to deteriorate.
How long should a flapper last?
A good quality rubber flapper typically lasts 4 to 5 years under normal use. Chlorinated water, hard water with high mineral content, and in-tank cleaning tablets all accelerate flapper deterioration.
If you use bleach cistern tablets, expect to replace the flapper more frequently — roughly every 2 to 3 years. Continuous chlorine exposure breaks down the rubber faster than exposure to clean water.
Is it worth replacing the entire fill valve or just adjusting the float?
Always try adjusting the float first. It costs nothing and takes two minutes. If adjusting the float stops the running, the fill valve itself is fine.
Replace the fill valve only if adjustment does not resolve the issue, if the valve is visibly corroded or cracked, or if the toilet is more than 10 years old and experiencing repeated issues. A new fill valve costs $15 and installs in under 30 minutes.
Ten Dollars and Thirty Minutes — Your Water Bill Will Thank You
A running toilet is one of those problems that sits quietly in the background, costing money until you deal with it. The parts are cheap, the tools are basic, and the fix is within reach of any homeowner willing to lift a tank lid.
Start with the dye test to confirm the flapper, check the water level against the overflow tube, and listen for the fill valve. Nine times out of ten, one of these three things is the answer.
Fix it today, and your next water bill will show the difference.