A dripping faucet is easy to ignore. The sound becomes background noise, and the water bill increase seems too small to act on. But a faucet dripping once per second wastes around 3,000 gallons of water per year.
More importantly, a dripping faucet does not fix itself. The internal components that cause the drip continue to wear down, and what starts as a slow drip becomes a steady stream that eventually requires more extensive repair.
This guide explains why faucets drip, how to identify what type of faucet you have, and exactly what to replace to stop the drip for each type.
Why Faucets Drip
Every faucet uses a seal to block water flow when closed. When you close a faucet handle, a component presses against a seat or disc to create a watertight barrier. When that seal wears out, water finds a way past it and drips from the spout.
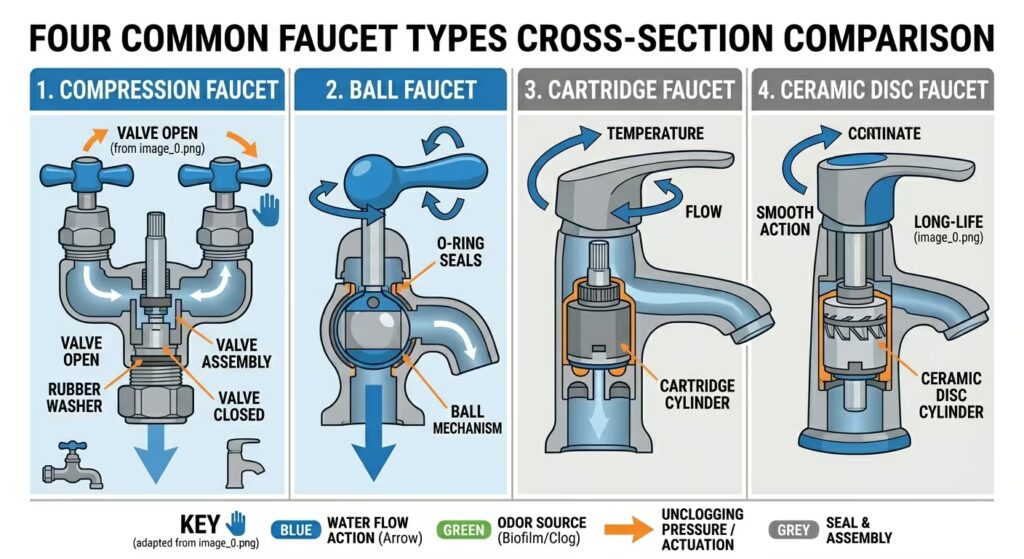
The type of seal and the way it wears depend on the faucet design. There are four main faucet types used in residential homes, and each one drips for a slightly different reason.
| Faucet Type | What Causes the Drip | Part to Replace |
| Compression | Worn rubber washer on the stem | Rubber washer and O-ring |
| Ball | Worn springs, seats, or O-rings | Ball repair kit |
| Cartridge | Worn or damaged cartridge | Replacement cartridge |
| Ceramic disc | Cracked disc or worn seals | Ceramic disc or full cylinder |
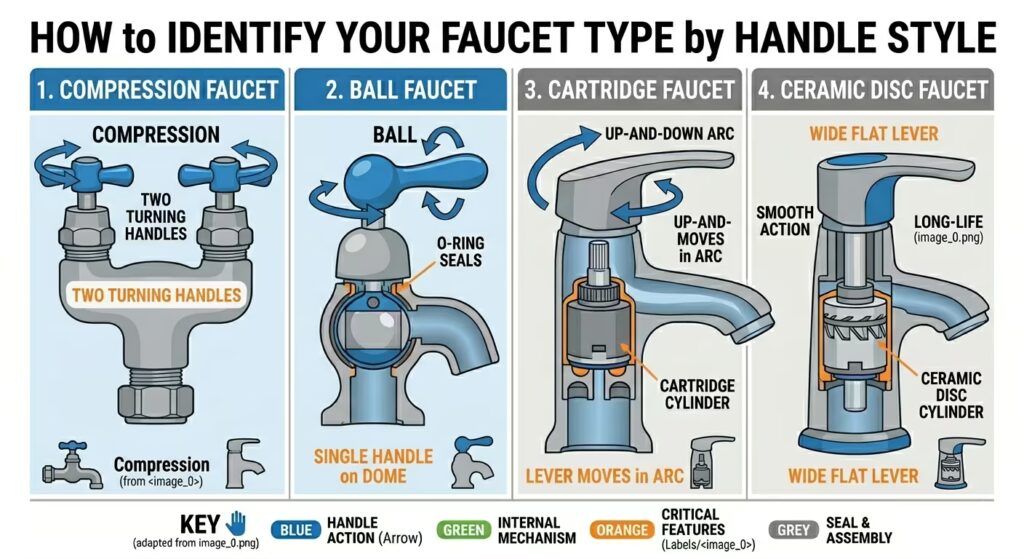
Identifying Your Faucet Type
The fix depends entirely on which type of faucet you have. Identifying yours takes about 30 seconds.
Compression faucet
Compression faucets have two separate handles, one for hot and one for cold. You turn each handle clockwise to close it and counterclockwise to open it. The resistance you feel as you close it is the rubber washer being compressed against the seat.
These are the oldest faucet designs and are common in homes built before the 1980s. They are the most likely to drip because the rubber washer wears down with every use.
Ball faucet
Ball faucets have a single handle that moves over a rounded cap. Moving the handle left and right controls temperature. Moving it up and down controls flow. They are common in kitchen sinks.
Inside the faucet, a ball-shaped component rotates to align holes that control water flow. Springs, rubber seats, and O-rings around the ball wear out, causing dripping.
Cartridge faucet
Cartridge faucets can have either one or two handles. The key identifier is how the handle moves. It moves up and down in a straight arc rather than turning like a compression faucet.
Inside is a cartridge cylinder that controls water flow. When the cartridge wears out, the faucet drips. Cartridge faucets are common in both bathrooms and kitchens in homes built from the 1980s onward.
Ceramic disc faucet
Ceramic disc faucets typically have a single wide lever that moves side to side for temperature and front to back for flow. They feel smooth and precise to operate.
Inside is a ceramic disc cylinder with two discs that slide against each other to control water. Ceramic is extremely durable, and these faucets rarely drip unless the disc cracks or the rubber seals around it deteriorate.
Tools and Supplies You Will Need
- Adjustable wrench or basin wrench
- Flathead and Phillips screwdrivers
- Needle-nose pliers
- Replacement parts matched to your faucet type and brand
- Plumber’s grease
- Rubber gloves
- A small bucket or towels
| Find your faucet brand before buying parts |
|---|
| Faucet repair parts are brand-specific in many cases, particularly cartridges. Look underneath the faucet or on the body for a brand name. Moen, Delta, Kohler, and American Standard are the most common brands in US homes, and all offer replacement parts by model number. |
How to Fix Each Faucet Type
Fixing a Compression Faucet
Compression faucets are the most straightforward to repair. The culprit is almost always a worn rubber washer at the bottom of the stem.
- Turn off the water supply under the sink. Turn on the faucet to release any remaining pressure in the line.
- Remove the handle. Most compression faucet handles are held in place by a screw beneath a decorative cap. Pop the cap off with a flathead screwdriver and unscrew the screw beneath it. Lift the handle off.
- Use an adjustable wrench to unscrew the packing nut clockwise. Lift out the stem.
- At the base of the stem, you will see a rubber washer held by a brass screw. Remove the screw and pry out the old washer. If the washer has a flat groove worn into it, that is the cause of the drip.
- Take the old washer to the hardware store to match the size, or replace it with a universal assorted washer kit. Also, replace the O-ring on the stem body while it’s apart.
- Apply a thin coat of plumber’s grease to the new washer and O-ring. Reassemble in reverse order.
- Turn the water supply back on and test. The drip should be fully resolved.
Fixing a Ball Faucet
Ball faucets have more internal components than other types. The easiest approach is a complete ball faucet repair kit specific to your brand. These kits include all the springs, seats, O-rings, and a new ball, removing the guesswork about which individual part to replace.
- Turn off the water supply under the sink.
- Remove the handle by loosening the set screw on the side or underneath the handle collar using a hex key. Lift the handle off.
- Unscrew the cap and collar by hand or with adjustable pliers wrapped in tape to protect the finish.
- Lift out the cam, cam washer, and rotating ball. Note the orientation of the ball before removing it.
- Use needle-nose pliers to remove the rubber seats and springs from the two inlet holes in the faucet body.
- Replace all seats, springs, O-rings, and the ball with the new components from the repair kit.
- Apply plumber’s grease to all rubber parts. Reassemble in reverse order, aligning the ball tab with the slot in the faucet body.
- Turn the water back on and test for drips.
Fixing a Cartridge Faucet
Cartridge replacement is the simplest repair among faucet types that have a single moving part. The key is getting the exact replacement cartridge for your brand and model.
- Turn off the water supply under the sink.
- Remove the handle by lifting any decorative cap and unscrewing the screw beneath it. Pull the handle straight up and off.
- Remove any retaining clip holding the cartridge in place. This is usually a small U-shaped metal clip at the top of the cartridge. Pull it straight out with needle-nose pliers.
- Grip the top of the cartridge with pliers and pull it straight up and out. Note which direction it faces before removing it.
- Take the old cartridge to the hardware store or look up the replacement using your faucet brand and model number. Moen, Delta, and most major brands sell replacement cartridges in any hardware store.
- Insert the new cartridge in exactly the same orientation as the old one. The ears on the side of the cartridge must align with the slots in the faucet body.
- Reinsert the retaining clip. Reassemble the handle. Turn the water on and test.
| Cartridge orientation is critical |
|---|
| A cartridge inserted upside down or rotated 180 degrees will reverse the flow of hot and cold water. If your hot and cold are switched after replacement, remove the cartridge and rotate it 180 degrees before reinstalling. |
Fixing a Ceramic Disc Faucet
Ceramic disc faucets rarely need repair, but when they drip, it is usually because sediment or mineral deposits have scratched the disc surfaces or the rubber seals have hardened with age.
- Turn off the water supply under the sink.
- Remove the handle by finding the set screw underneath or behind the handle lever. Unscrew and lift the handle off.
- Unscrew the disc cylinder cartridge from the faucet body. It is usually held by two or three screws.
- Lift the cylinder out and examine the ceramic discs inside. Look for chips, cracks, or scratches on the disc surfaces.
- Clean the discs with white vinegar and a soft cloth to remove any mineral deposits. If the discs are undamaged, reinstalling cleaned discs often resolves the drip.
- If the discs are cracked or chipped, replace the entire cylinder. Take the old cylinder to a plumbing supply store to match the replacement, or order by brand and model number.
- Apply a thin coat of plumber’s grease to the rubber seals. Reassemble and test.
Where Is the Water Coming From?
The location of the drip gives additional information about which component has failed.
| Drip Location | Most Likely Cause |
| From the spout when the handle is closed | Worn washer, cartridge, or internal seal |
| Around the base of the spout | Worn O-rings on the spout body |
| At the base of the handle | Worn packing or O-ring around the stem |
| Under the sink at the supply connections | Loose or worn supply line connection — tighten or replace the line |
| Pooling water under the sink cabinet | P-trap joint, supply line, or drain connection — inspect all connections |
What a Dripping Faucet Actually Costs
A faucet that drips once per second wastes approximately 3,000 gallons per year. Faster drips waste proportionally more.
| Drip Rate | Annual Water Waste | Estimated Annual Cost |
| 1 drip per second | 3,000 gallons | $10 to $25 |
| 2 drips per second | 6,000 gallons | $20 to $50 |
| Steady trickle | 20,000 gallons or more | $70 to $150+ |
| Cost of a repair kit | One-time fix | $5 to $30 typically |
Beyond water cost, a dripping faucet accelerates wear on the fixture finish and the drain. The constant moisture also promotes mould growth around the sink area over time.
When to Call a Plumber
Most faucet drips are DIY-manageable repairs. A plumber makes sense in a few specific situations.
- The faucet is very old, and the brand or model is discontinued, making replacement parts unavailable
- The faucet body itself is cracked or corroded beyond the internal components
- You discover the leak is not from the faucet internals but from the pipes behind the wall or under the sink
- After replacing the faucet, it continues to drip, and you cannot identify the remaining cause
- The repair requires turning off the main water supply, and you are not comfortable doing that
Frequently Asked Questions
Can I just tighten the handle to stop a drip?
No. Tightening the handle forces the worn washer or seal to seat more firmly against the seat. This may temporarily slow the drip, but it accelerates wear on both the washer and the seat. The drip will return faster and may be harder to fix when it does.
Replace the worn part rather than forcing the handle tighter. It is a faster and more reliable fix.
My faucet drips only when I run hot water. Why?
A faucet that drips only on the hot side usually means the hot-water-side washer or cartridge is worn, while the cold-side is still functional. In a compression faucet, the hot and cold sides have separate stems and washers, so one can fail independently of the other.
Fix only the affected side. There is no need to disassemble the working side.
The drip started right after I had a plumber work on the sink. Is that related?
It is possible. Work that involves shutting off and restoring water pressure can dislodge sediment that settles against worn seals, exposing a previously stable pre-existing weakness.
It can also indicate that a component was not fully tightened during the previous work. Contact the plumber and describe the timing. A reputable plumber will return to investigate at no additional cost.
How do I know whether my faucet is worth repairing or should be replaced?
If the faucet is less than 10 years old and the body is in good condition, repair is almost always worth it. Parts cost a fraction of a new faucet, and the job takes under an hour.
If the faucet is over 15 years old, showing signs of corrosion, or is a lower-quality brand where parts are hard to find, replacement is often more cost-effective in the long term. A new mid-range faucet installed yourself costs $50 to $150 and will not need repair for years.
My faucet drips from the base of the spout, not the tip. Is that different?
Yes. Dripping from the spout tip is an internal seal problem. Leaking from the spout base or the area where the spout meets the sink deck is caused by worn O-rings on the spout body itself.
To fix a spout base leak, remove the spout from the faucet body and replace the O-rings around the spout shank. The process is straightforward but requires removing the spout entirely, not just the handle.
A Small Repair That Pays Back Every Month
A dripping faucet is one of those repairs where the cost of doing nothing is higher than fixing it. A five-dollar washer or a twenty-dollar cartridge stops the drip, stops the waste, and stops the fixture damage before it compounds.
Identify the faucet type, get the right part, and follow the steps for your type. Most homeowners complete the repair in under an hour on their first attempt.
The tap that no longer drips is one of the most satisfying small wins in home maintenance.