
Most yearly water heater maintenance is safe to do yourself. Checking the temperature, looking for leaks, testing the relief valve and flushing out sediment take about an hour a year with a garden hose and a bucket. Call a licensed pro for anything that involves the gas supply, the burner or the vent pipe, a relief valve that will not stop dripping, an anode rod that will not budge, or water leaking from the tank itself.
This guide shows which jobs fall on which side of that line, how to do the DIY ones safely, and what a professional visit costs if you would rather not.
Who Should Do What: Quick Answer
| Task | How often | DIY or pro? | Time |
|---|---|---|---|
| Check the temperature setting (120°F) | Once a year | DIY | 5 minutes |
| Look for leaks, rust and drips | Every 1 to 2 months | DIY | 2 minutes |
| Test the temperature and pressure (T&P) relief valve | Once a year | DIY, carefully | 5 minutes |
| Flush sediment from the tank | Once a year | DIY | 30 to 60 minutes |
| Inspect the anode rod | At 3 years, then yearly | DIY if it comes out easily; pro if it is seized | 30 to 60 minutes |
| Insulate the tank and pipes | Once | DIY | 30 minutes |
| Descale a tankless unit | Per the manufacturer, often yearly | DIY with a pump kit, or pro | About 1 hour |
| Burner, pilot, gas valve or vent pipe work | When needed | Pro only | — |
| Replacing the water heater | Every 8 to 12 years | Pro (usually needs a permit) | — |
What You Can Safely Do Yourself
Before any hands-on job, turn the heater off. For an electric heater, switch off its breaker at the panel. For a gas heater, turn the gas control knob to “Pilot” or “Vacation.” Hot water can scald, so let the tank cool for a few hours before you drain anything.
1. Set the temperature to 120°F
The U.S. Department of Energy recommends 120°F as a temperature that is safe for most households. Higher settings cost more to run and speed up mineral buildup inside the tank. On a gas heater the dial is on the front of the gas valve. On an electric heater, the thermostats sit behind the two access panels on the side; switch off the breaker before you open them.
2. Look for leaks every month or two
Take a flashlight and check the floor and drain pan around the base, the pipe connections on top, the drain valve near the bottom and the end of the relief valve’s discharge pipe. A damp drain valve or a dripping fitting is a cheap fix. Water coming from the tank body itself, or rust running down the outside, usually means the tank is failing; see our guide to the signs your water heater is failing.
3. Test the T&P relief valve once a year
The temperature and pressure relief valve is the safety device that stops the tank from over-pressurizing. The A.O. Smith owner’s manual says it must be operated by hand at least once a year.
- Put a bucket under the end of the discharge pipe and make sure nobody is standing near it. The water that comes out can be scalding.
- Lift the valve’s lever for 2 to 3 seconds, then let it snap back.
- You should hear water rush out, and it should stop as soon as you let go.
- If nothing comes out, or the valve keeps dripping after you release it, turn the heater off and have the valve replaced. Never plug or cap the discharge pipe.
4. Flush the tank once a year
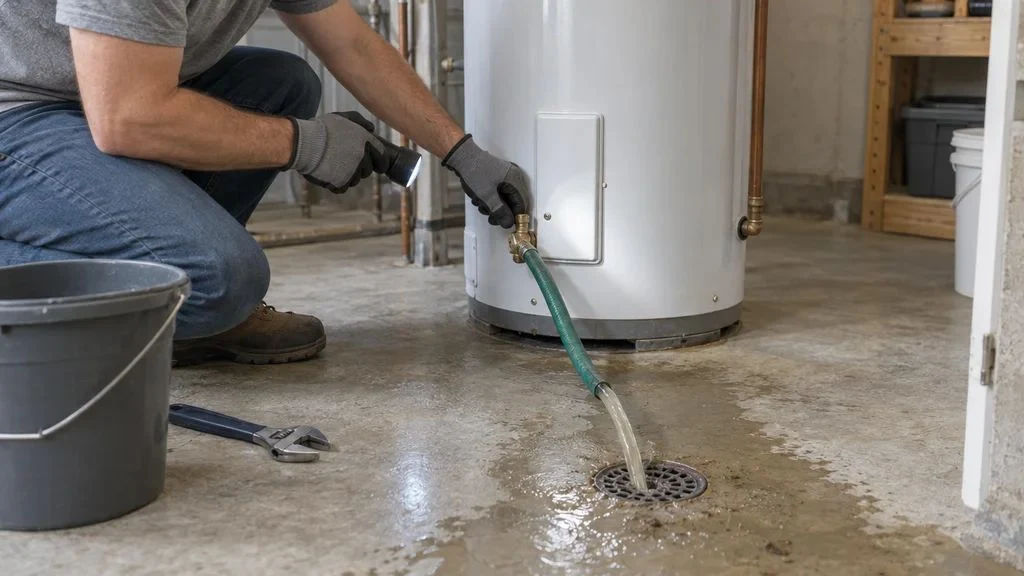
Sediment settles at the bottom of the tank, makes the heater work harder and causes the popping and rumbling noises many people hear. A yearly flush removes most of it. Our step-by-step guide to flushing a water heater covers every step. In short:
- Turn the heater off (breaker or “Pilot”) and close the cold water supply valve on top of the tank.
- Open a hot water tap somewhere in the house so air can get in.
- Attach a garden hose to the drain valve and run it to a floor drain or outside.
- Open the drain valve and let the tank empty. Briefly reopen the cold supply a few times to stir up sediment until the water runs clear.
- Close the drain valve, refill the tank with the hot tap still open until water flows steadily, then turn the power or gas back on.
Between yearly flushes, the U.S. Department of Energy suggests draining about a quart from the drain valve every 3 months to keep sediment from building up. If a professional flush is easier for you, HomeAdvisor puts the typical price at $110 to $200 (HomeAdvisor).
5. Check the anode rod
The anode rod is a metal rod that corrodes on purpose so the steel tank does not. Once it is used up, the tank starts to rust from the inside. The A.O. Smith owner’s manual says to inspect it after no more than 3 years, then every year after that, and every year from the start if you have a water softener.
You will usually need a 1-1/16 inch socket and a breaker bar to loosen the hex head on top of the tank (turn the water off and release some pressure first). Replace the rod if most of it is worn below about 3/8 inch thick or the steel core wire is showing. If the rod will not turn without heavy force, stop: forcing it can damage the tank fitting, and a plumber has the tools to remove it safely.
6. Insulate the tank and pipes
If your tank feels warm to the touch, the U.S. Department of Energy says insulating it can cut water heating costs by 7% to 16% a year. Pre-cut insulation blankets are inexpensive and take about 30 minutes to fit. On a gas heater, keep the blanket clear of the top, the burner access, the gas valve and the vent pipe. Foam sleeves on the first few feet of hot and cold pipes help too.
Jobs to Leave to a Licensed Pro
These jobs carry a real risk of gas leaks, carbon monoxide, electric shock or flooding. Call a licensed plumber (or your gas utility, where noted):
- You smell gas. Do not touch any switches. Leave the house and call your gas utility or 911 from outside.
- Burner, pilot assembly, gas valve or thermocouple problems on a gas heater.
- Anything to do with the vent pipe or flue, including a vent that is loose, rusted or showing soot. A faulty vent can leak carbon monoxide.
- A relief valve that keeps dripping or will not reseal, or water discharging from it on its own.
- A seized anode rod that will not turn with reasonable force.
- Electrical work you are not comfortable with, such as replacing heating elements or thermostats on an electric heater.
- Water leaking from the tank body. This cannot be repaired; the heater needs replacing.
- Installing or replacing a water heater. Most areas require a permit and an inspection.
Tankless Water Heater Maintenance
Tankless units have no tank to flush, but minerals build up inside the heat exchanger, especially with hard water. Most manufacturers call for descaling on a set schedule, often once a year. If your unit has service valves on the water lines, you can do it yourself with a small pump, two hoses, a bucket and white vinegar or the descaling solution your manual names; the pump circulates the solution through the heat exchanger for about an hour. Clean the inlet water filter screen at the same time. Gas tankless units should also have their burner and venting checked by a pro. Comparing models? See our best tankless water heaters.
A Simple Yearly Maintenance Schedule
| When | What to do |
|---|---|
| Every 1 to 2 months | Quick look for leaks, rust and drips |
| Every 3 months | Drain about a quart from the drain valve |
| Once a year | Check the temperature, test the T&P valve, flush the tank |
| At 3 years, then yearly | Inspect the anode rod (yearly from the start with a water softener) |
| Every year (gas units) | Have a pro check the burner and venting if you see soot, a yellow flame or rust on the vent |
When Maintenance Is No Longer Worth It
Maintenance helps a healthy heater last longer, but it will not save one that is at the end of its life. Check how long a water heater lasts for your type. If yours is past that age, rusting or leaking from the tank, plan the replacement before it fails: start with tank vs. tankless water heaters, then compare models in our best tankless water heater picks.
Frequently Asked Questions
Can flushing an old water heater cause a leak?
Sometimes. On a heater that has never been flushed, a thick layer of sediment can be covering a weak spot in the tank, and removing it can reveal a leak that was already there. If your heater is old and has never been flushed, check it closely afterward, and be ready to start planning a replacement.
Do I need to turn off the power before flushing?
Yes. Running an electric heater with an empty tank can burn out the heating elements in seconds. Switch off the breaker, or set a gas heater to “Pilot,” before you drain it, and only turn it back on once the tank is full again.
Does DIY maintenance void the warranty?
Routine tasks such as flushing and testing the relief valve are the ones manufacturers ask owners to do in their manuals. Repairs to gas parts or replacing components yourself can affect coverage, so read your warranty terms before you open anything beyond the access panels.
How often should a professional look at my water heater?
If you do the yearly tasks above, a gas heater benefits from a professional check of the burner and venting every year or two, and any heater benefits from one when it passes about 10 years old.
Start With the 15-Minute Checks
You do not need to do everything at once. This week, check the temperature setting and look for leaks. Next weekend, test the relief valve and flush the tank. Those four jobs handle most of what a maintenance visit would, and they tell you early if something needs a professional.
About HomePlumbing101
HomePlumbing101 turns manufacturer manuals, product specifications and public guidance from sources like the U.S. EPA and Department of Energy into plain, step-by-step help for homeowners. Every guide flags the jobs that need a licensed plumber. We are an information site only and do not offer plumbing or HVAC services. More about how we write our guides.