Flushing a water heater is one of the most effective maintenance tasks a homeowner can do. It takes less than an hour, requires no special skills, and can add years to the unit’s life.
Yet most homeowners have never done it. Sediment quietly accumulates at the bottom of the tank year after year, reducing efficiency and accelerating wear.
This guide walks you through the entire process of flushing a water heater, from start to finish, including what to do for both gas and electric units and how to handle the few things that can go wrong.
Why Flushing the Water Matters
As water is heated, naturally occurring minerals like calcium and magnesium separate from the water and settle at the bottom of the tank. Over time, these deposits accumulate into a dense sediment layer.
That sediment layer acts as an insulating barrier between the heating element or burner and the water. The heater has to work harder and longer to reach the set temperature, consuming more energy with each cycle.
Left long enough, sediment also traps heat against the tank’s inner lining, accelerating corrosion. In gas heaters, it causes the popping and rumbling noises that many homeowners hear but rarely investigate.
| RELATED: Why Is My Water Heater Making a Popping Noise? |
|---|
| That banging or rumbling from your water heater is almost always sediment. Read our guide on what the different noises mean and what to do about each one. |
How Often Should You Flush a Water Heater?
Once a year is the standard recommendation for most households. In areas with hard water, where mineral content is high, flushing a water heater every six months gives better results.
If you have never flushed your heater and it is more than 2 or 3 years old, expect to see a significant amount of sediment in the first flush. Annual flushing after that will keep it manageable.
| Water Type | Recommended Flush Frequency |
| Soft water area | Once a year |
| Moderate hard water | Once a year |
| Very hard water area | Every 6 months |
| Never flushed before | Flush now, then annually |
What You Need Before You Start
- A standard garden hose long enough to reach a floor drain, utility sink, or outdoor area
- A flathead screwdriver or a hose bib key for the drain valve
- Work gloves — the water draining from the tank will be very hot
- A bucket for the initial water test, if you want to inspect the sediment
| SAFETY FIRST: The water inside your tank can be up to 140 degrees Fahrenheit |
|---|
| Do not rush the cooldown step. Hot water from the drain valve can cause serious burns. Always wear gloves and keep children and pets away from the work area during the flush. |
Step-by-Step: How to Flush a Tank Water Heater
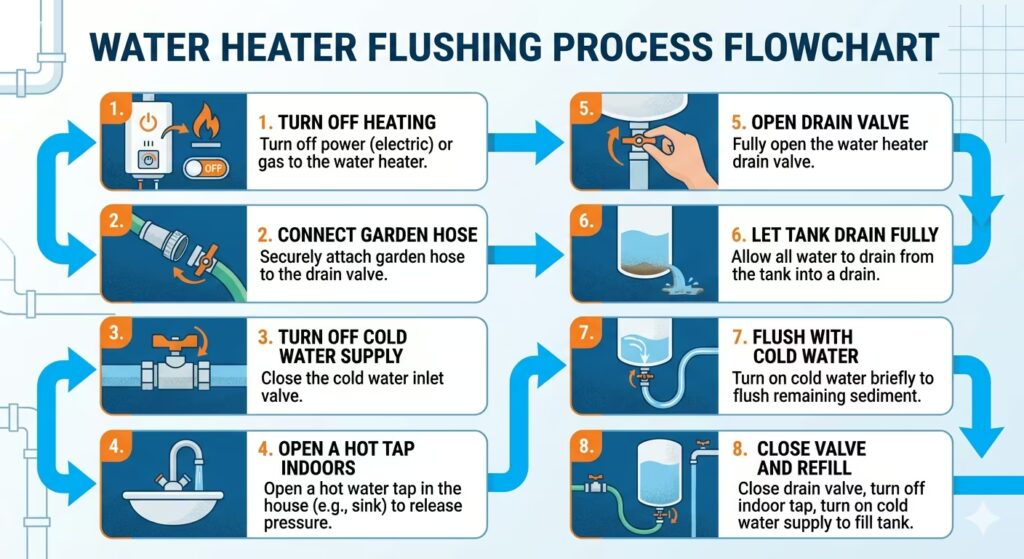
Step 1: Turn off the heating element or gas supply
For electric water heaters, go to your breaker panel and switch off the circuit labeled for the water heater. Do not skip this step — running the heating element dry will burn it out immediately.
For gas water heaters, turn the thermostat dial to the “Pilot” setting. Do not turn the gas off entirely. The pilot setting puts the burner on standby without extinguishing the pilot light.
Step 2: Let the water cool
This step requires patience but protects you from serious burns. Wait at least two hours after turning off the heater before draining.
If you are working on a heater that has been running recently, waiting longer is better. A full tank of 140-degree water is genuinely dangerous to drain without cooling first.
Step 3: Connect a garden hose to the drain valve
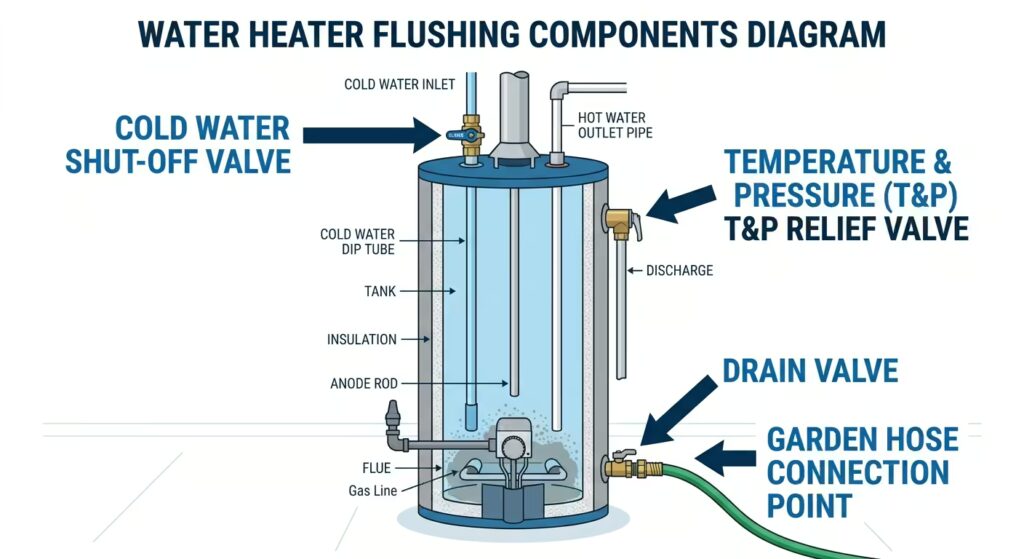
The drain valve is located near the base of the tank. It looks like an outdoor spigot or a plastic threaded cap.
Thread one end of the garden hose onto the drain valve and run the other end to a floor drain, utility sink, or outside. Make sure the hose runs downhill or stays level — it will not drain if the end is higher than the valve.
Step 4: Turn off the cold water supply
Find the cold water shut-off valve at the top of the unit and turn it clockwise until it stops. This prevents fresh water from entering the tank while you drain.
Step 5: Open a hot tap somewhere in the house
Turn on a hot water tap in a nearby sink or bathtub and leave it running. This prevents a vacuum from forming inside the tank, which would stop the water from draining.
You will see the flow from this tap slow to a trickle, then stop, as the tank drains. That is normal.
Step 6: Open the drain valve
Slowly open the drain valve by turning it counterclockwise. Water will begin flowing through the hose.
The first water out will likely be discoloured and contain visible sediment. This is exactly what you are removing. Let the tank drain completely.
| If the water runs clear immediately |
|---|
| That is a good sign. It means your tank has been well-maintained or recently flushed. Let it drain fully anyway to clear any loose sediment from the bottom. |
Step 7: Flush with cold water to clear remaining sediment
Once the tank is empty, briefly turn the cold water supply back on. This stirs up any remaining sediment at the bottom and flushes it out through the hose.
Run the cold water for 2 to 3 minutes or until the water running out of the hose appears clear. Repeat if the water is still heavily discoloured after the first round.
Step 8: Close the drain valve and refill the tank
Close the drain valve firmly by turning it clockwise. Do not overtighten — drain valves on older heaters can crack if forced.
Disconnect the hose, then turn the cold water supply back on. Let the tank fill completely before restoring power or relighting the gas.
Step 9: Restore power or relight the gas
For electric units, go back to the breaker panel and switch the water heater circuit back on. The unit will begin heating immediately.
For gas units, turn the thermostat dial from “Pilot” back to your desired temperature setting. The burner will ignite automatically on most modern units.
Allow 30 to 60 minutes for the tank to reheat before drawing hot water.
What to Check After Flushing a Water Heater
Once the tank has refilled and the heater has returned to normal operation, take a few minutes to check the following.
- Run a hot tap and check that the water runs clear with no discoloration
- Inspect the drain valve for drips — tighten slightly if it is not fully sealed
- Check the area around the base of the heater for any moisture
- Confirm the pressure relief valve is not dripping
| If the drain valve drips after closing |
|---|
| Sediment can prevent old drain valves from sealing fully after a flush. Try opening and closing the valve a few times to clear any particles caught in the seal. If it continues to drip, the valve needs to be replaced. A plumber can do this quickly and inexpensively. |
Flushing a Tankless Water Heater Is Different
The steps above apply only to tank water heaters. Flushing a tankless unit involves circulating a descaling solution through the heat exchanger using a small pump and hose kit.
The process takes about an hour and requires a descaling solution such as white vinegar or a purpose-made tankless descaler. Most tankless manufacturers recommend descaling once a year in hard water areas.
Refer to your unit’s manual for the specific procedure, as the valve locations and bypass setup vary between brands.
Common Problems When Flushing a Water Heater and How to Handle Them
The drain valve will not open
Older valves, particularly plastic ones, can seize up from years of inactivity. Apply gentle pressure and turn slowly. Do not force it.
If the valve is completely seized, stop and call a plumber. Forcing a brittle valve risks breaking it, which turns a simple maintenance task into an urgent repair.
The water does not stop running from the hose after closing the valve
Sediment or mineral scale may be preventing the valve from sealing. Open and close it several times to dislodge the obstruction.
If the drip persists, the valve seat is likely worn, and the valve needs to be replaced. This is a minor repair a plumber can handle in under an hour.
Very little or no water drains out
This usually means the hose end is higher than the drain valve, or a kink in the hose is restricting flow. Check the hose run and straighten any kinks.
If the flow is still blocked, there may be heavy sediment packed tightly around the valve opening. Try briefly flushing with cold water to break it up.
The water stays discoloured even after multiple flushes
Heavy discoloration that does not clear after two or three flush cycles can indicate internal tank corrosion rather than just sediment.
This is worth a professional inspection. Persistent rust-coloured water from the hot tap is one sign that a water heater may be nearing the end of its life.
| RELATED: How to Tell If Your Water Heater Is Failing |
|---|
| Persistent discoloration is one of seven warning signs that a unit may need to be replaced rather than maintained. Read our full guide to know what to watch for. |
Frequently Asked Questions
Do I need to flush a brand-new water heater?
Not immediately. A new unit has no sediment buildup. Start annual flushing after the first year of use.
Can flushing a water heater damage it?
Flushing a very old heater that has never been flushed carries a small risk. Sediment can actually be plugging minor leaks in a corroded tank.
If the unit is already over 10 years old and showing signs of wear, it is worth having a plumber assess it before attempting a first flush.
Should I flush a water heater before replacing the anode rod?
Yes. Flushing before replacing the anode rod clears sediment and gives you a clearer view of the tank’s interior condition. Do both tasks in the same maintenance session.
How long will my water heater be out of service during a flush?
Plan for 3 to 4 hours total. That includes the 2-hour cooldown, the 30 to 45 minutes of active work, and the hour to reheat the tank afterward.
Is cloudy or milky water after refilling normal?
Yes. Air introduced during the drain-and-refill process causes temporary cloudiness. Run the hot tap for a few minutes, and the water should clear on its own.
An Hour a Year Keeps the Plumber Away
Flushing a water heater once a year is one of the simplest and most cost-effective home maintenance tasks.
It removes the sediment that reduces efficiency, causes noise, and accelerates corrosion. It takes less than an hour of active work and requires nothing more than a garden hose.
Add it to your annual home maintenance checklist, and your water heater will reward you with years of reliable, efficient service.
| TOOL: Smart Home Plumbing Checklist |
|---|
| Use our free interactive checklist to track your annual water heater flush alongside all your other home plumbing maintenance tasks. Get a plumbing health score and a printable record. |